New Kegerator
Overview
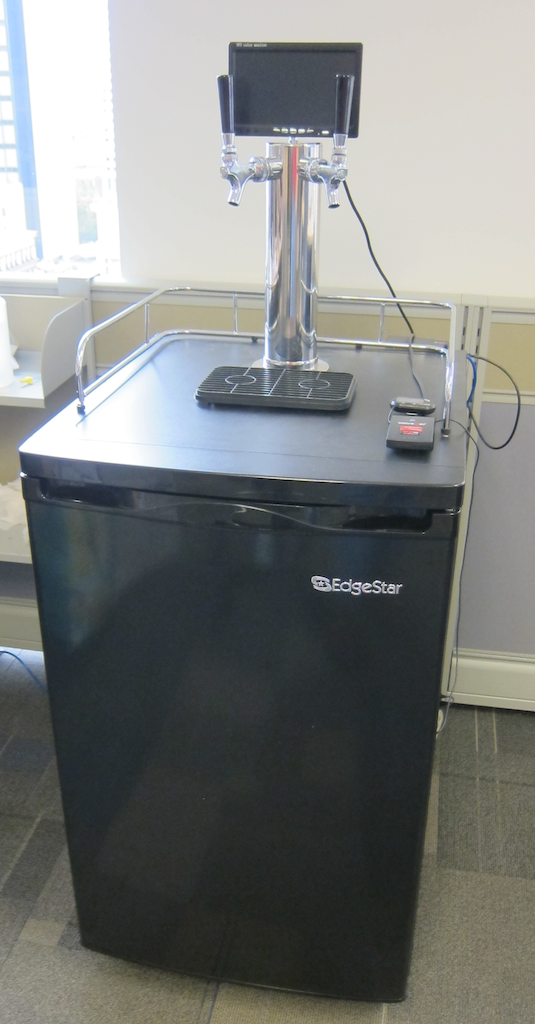
A few years ago, I used the Kegbot software to add some access control to a kegerator at work. The kegbot.org project is excellent, but it had a lot of complexity and features we were not using. With current technologies, it’s possible to create the same functionality using more convenient, off-the-shelf parts. I selected the Raspberry Pi ARM-based single-board computer to act as the core for this system, and we custom-tailored the rest of the system specifically for our needs.
Bill of Materials
There are a few miscellaneous parts that you’ll want to make working with the system a bit easier
| 16x #4-40 bolts and nuts (1/2” to ¾” long) | To mount the relay boards in the project box |
| M6 bolt, nut, washer | To vertically mount the monitor |
| 24” of 20AWG wire | Used for interconnects in the daughterbox |
| 6’ 18AWG speaker wire & 4x ¼” crimp-on connectors | Connects the daughterbox to the solenoids inside the fridge |
Construction
Setting up the Raspberry Pi
Most RPi systems now come with NOOBS, the new out-of-box OS. Upon startup, select the Raspian distribution, and create a new user, kegerator. Add kegerator to sudoers, as well. Once done, you can remote into X using the command ssh –X <user>:<ip>, and work from your desk instead of in front of the RPi.
First, you should disable root ssh access by navigating to /etc/sshd/sshd.conf and setting permitrootlogon = no
Then, update the Raspberry Pi:
sudo apt-get update
sudo apt-get upgrade
Now that the OS is current, we need to build our LAMP stack. Start by running
sudo raspi-config
Since this machine won’t be used for heavy graphics, set graphical memory split to 32MB. You’ll also want to add a hostname like mykegerator. Once you have the base OS configuration, install the packages we’ll need
sudo apt-get install apache2 mysql php python-mysqldb phpmyadmin
If you want to run HTTPS, You can add a self-signed cert
http://www.sslshopper.com/article-how-to-create-and-install-an-apache-self-signed-certificate.html
Once the certificate is created, run
sudo a2enmod ssl
To enable mod_ssl in this version of Apache. Then modify the sites-config to enable the ssl virtualhost. There are lots of tutorials on this online. Now that our core LAMP stack is running, we need to build our application!
Setting up the Database
In MySQL, create a new database called “kegerator” with user “kegerator”.
Below is the data model we used for this build
Drinkers
| Name | Type | Comments |
| Card_no | Varchar(10) | Primary Key |
| Fname | Varchar(32) | |
| Lname | Varchar(32) | |
| Credits | Int | Not null, default 0 |
Kegs
| Name | Type | Comments |
| ID | Int | Primary Key, Auto Increment |
| Brewer | Varchar(64) | |
| Name | Varchar(64) | |
| Size | Float | Size of keg, in gallons |
| Style | Varchar(20) | Beer style |
| ABV | Float | Alcohol By Volume |
| Image | Varchar(128) | Contains relative path to the image |
| On_Tap | Int |
Drink
| Name | Type | Comments |
| ID | Int | Primary Key, Auto Increment |
| Card_no | Varchar(10) | |
| Timestamp | DATETIME |
That sets up our main data store. Copy the index.php file into /var/www, making sure the permissions are 644. Then edit the file and configure the sql connect statement appropriately. We also have an .htaccess file will enable the index.php file for you.
Now that the web site is set up, we need to build the python engine that runs the badge reader!
Badge Reader
The RDR-80581AKU reader acts as a HID device (keyboard) and “types” the badge number when a card is scanned. In order to read from this, we need a few python libraries.
sudo apt-get install python-dev python-pip python-rpi.gpio
sudo pip install evdev
Copy the engine.py script to /usr/local/bin/kegbot. This way our startup script can find it.
The engine.py script takes control of all incoming keystrokes (from a badge reader or attached USB keyboard), and checks them against the database. You may need to edit this script to contain the correct database name and password for your kegbot user.
Set up Syslog
The engine.py script logs data to syslog under the local0 facility. To make troubleshooting easier, create a filter for rsyslogd that will shut all of that data to its own file
sudo vi /etc/rsyslog.d/kegbot.conf
Add the following as one long line:
if $syslogfacility-text == ‘local0’ and $programname == ‘engine.py’ then /var/log/engine
Set up init Script
We want the engine.py script to launch automatically when the RPi is started. The easiest way to do this is to call it from a daemon wrapper that is installed into the Linux init.d script. Review http://blog.scphillips.com/2013/07/getting-a-python-script-to-run-in-the-background-as-a-service-on-boot/ for more info on doing this.
LCD Display
Finally, we’ll set up our kegerator display. When the Pi boots, it will pick up the little screen connected to the video out port, but you may want to tweak the resolution
cd /boot
sudo vi config.txt
Add the following lines:
framebuffer_width=600
framebuffer_height=400
By default, the pi will boot into normal user “pi”. We want the system to show our webpage in kiosk mode. I chose to use Midori because it’s lightweight and comes on the distribution natively.
cd /etc/xdg/lxsession/LXDE
sudo vi autostart
Add the following lines:
@xset s off
@xset -dpms
@xset s noblank
@midori -e Fullscreen -a http://my-kegerator
Build the daughterbox
One of the benefits of using the RPi are the General Purpose I/O (GPIO) pins available on the board. We’ll use two of these to drive our solenoids, which will prevent beer flow to unauthorized users. The GPIO pins don’t provide enough power to switch the solenoids, so we need to run them through a relay. The daughterbox contains the electronics to make this work, and provide a safe separation for the 12V system. It’s important to keep this isolated from the RPi, as the higher voltage will fry it!
The box is broken up into 3 types of boards. This makes troubleshooting easier and simplifies assembly.
-
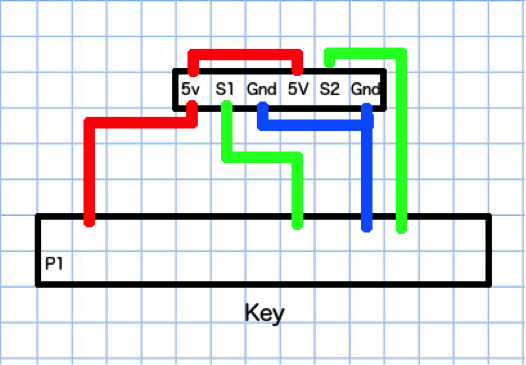
RPi header
The RPi header board contains simple routing to break out the needed +5V, Ground, and Data pins from the RPi header to a standard 0.1” header for connection to the relay boards
-
Relay Boards
The Relay boards are a reference design from Sparkfun. I like these boards because they are easy to assemble, hugely overbuilt for our needs (These can switch 240V!), and are drop-in replaceable. Sparkfun has a tutorial on building them.
-
12V distribution board
The 12V distribution board exists to give us additional flexibility with the hardware. By using a standard 2.1mm Barrel jack, we can use a laptop power supply to provide our 12VDC, and although we used screw terminals in this design, you could use a different type of connector for the solenoids to make your project a bit prettier. The solenoids we’ve selected run at 1.1A max, so we used 20ga wire for the distribution board (our runs are really short ), and 18ga speaker wire for the runs from the board to the solenoids (runs are about 3 feet).
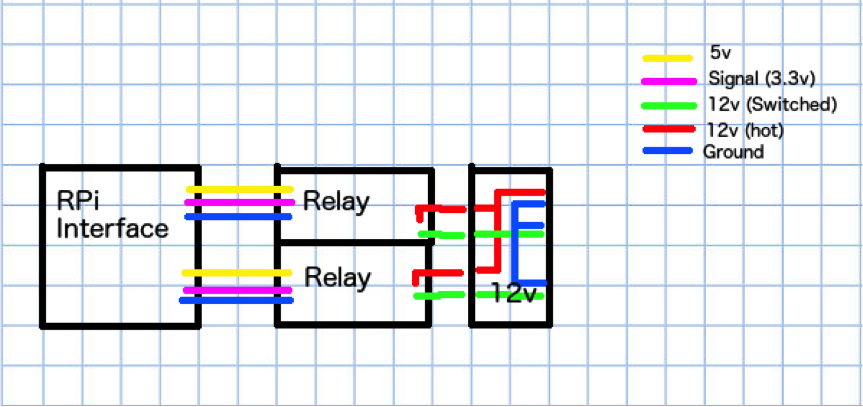
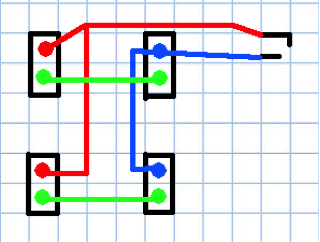
Wire up each board and test thoroughly with your voltmeter – we want to make sure each board is isolated. Once complete, you can connect them as seen below.
Final Assembly
Now that we have all of the parts, we can assemble the kegerator. Splice the solenoids into the beverage line between the tap and the faucet (don’t splice them into the gas line, that won’t help). Use Teflon tape and check for leaks!
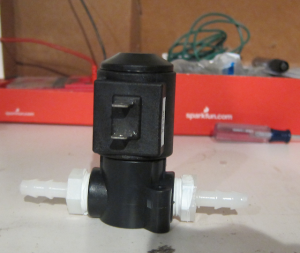
Wire up the solenoids using the 18ga speaker wire, and mount the screen and controller boxes.

Plug them all in, and you’re ready to pour!
Enhancements
Like any project, there are some enhancements that we didn’t have time to add in the first phase. Some things we’d like to see:
- A time lock, so the kegs only operate after 4p daily (3p on Fridays!)
- Set up user permissions per-tap. That way you can put high-ABV beer on (or non-alcoholic for those not of legal age)
- Add flowmeters or weight sensors so we can see what beer a user has poured. With the current design of opening both taps, a user could drink 2 beers for the price of one.
- Add a temperature sensor inside of the fridge and record
- Automatic credit addition via bill reader
Usage
To add a keg
Upload image using SCP to /var/www/images
Scp <local_file> mykegerator:/var/www/images
Log into phpmyadmin at: https://<server>/phpmyadmin
Create a new entry
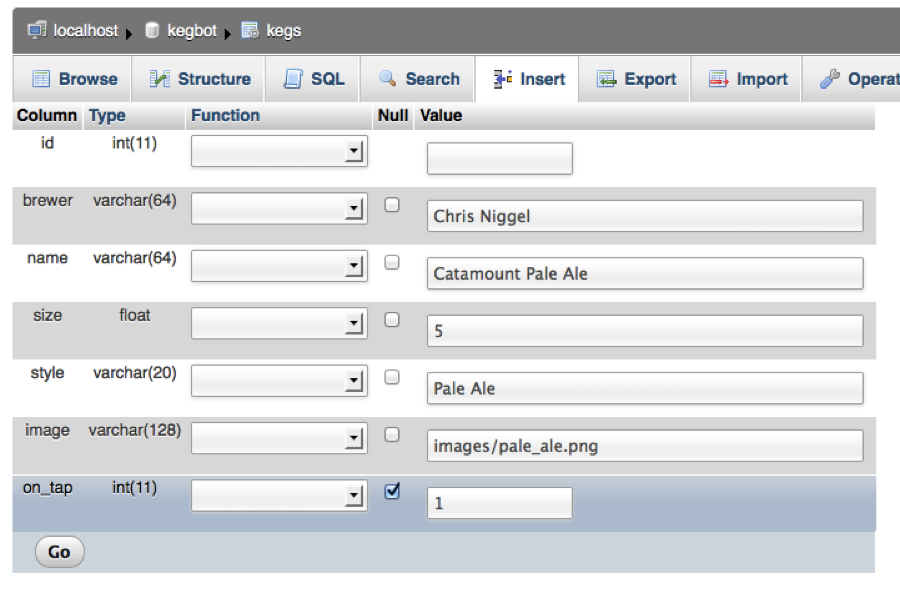
Set the Tap field to which beer is on which tap (1 or 2). Be sure to take a beer off, since the UI doesn’t do any error checking right now.
To add a user
You’ll need to use ssh to do this.
Have the user badge in once or twice (sometimes the reader gives some strange readings, so 2 attempts should be good)
SSH into the kegbot
Enter “tail /var/log/engine”
Look for a recent error line
You may also be able to find the badge number printed on the side of the badge.
Now, open up mysql
$>mysql –ukegbot –p kegbot
and insert the user
mysql>insert into drinkers values (<badge_no>,<fname>,<lname>,<credits>)

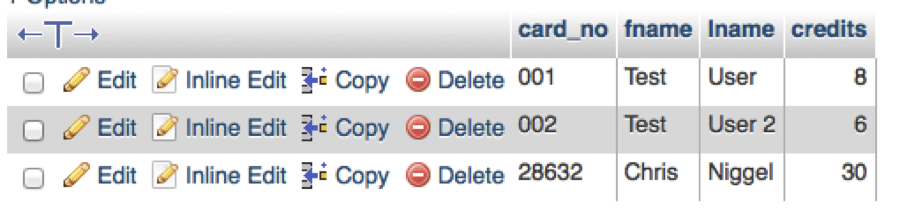
You may also need to update credits
$>mysql –ukegbot –p kegbot
mysql>update drinkers set credits=<value> where card_no=<card_no>
Due to some caching in the Mysql connector, you may need to recycle the engine service after you add users:
$> sudo /etc/init.d/engine.sh restart
Download the code here!
No trackbacks yet.